R computation

Decentriq’s Data Clean Rooms support running arbitrary R scripts in confidential computing, guaranteeing a high level of security. You can use R to perform complex statistical analyses on sensitive data that is never revealed to anyone.

Current version

decentriq.r-ml-worker-32-32:v1

Available libraries

R version: 4.3.2

  • Hmisc (5.1.1)
  • pROC (1.18.4)
  • ggplot2 (3.4.4)
  • ggmosaic (0.3.3)
  • dplyr (1.1.3)
  • ggforce (0.4.1)
  • lubridate (1.9.3)
  • lme4 (1.1.34)
  • coxme (2.2.18.1)
  • cmprsk (2.2.11)
  • msm (1.7)
  • randomForestSRC (3.2.2)
  • survminer (0.4.9)
  • tidyverse (2.0.0)
  • corrplot (0.9.2)
  • readxl (1.4.3)
  • lime (0.5.3)
  • e1071 (1.7-13)
  • effects (4.2-2)
  • lmtest (0.9-40)
  • AER (1.2-10)
  • sandwich (3.0-2)
  • vcd (1.4-11)
  • mclust (6.0.0)
  • lcmm (2.1.0)
  • openxlsx (4.2.5.2)
  • xgboost (1.7.5.1)
  • conflicted (1.2.0)
  • factoextra (1.0.7)
  • naniar (1.0.0)
note

The list of available libraries is not exhaustive.

How it works

The R enclave worker is available as a confidential computing containerized environment inside a Data Clean Room, that takes datasets as input, executes an arbitrary script and generates an output. The container does not have any port open, therefore performing HTTP requests or accessing external resources is not possible. All relevant files must be mounted in advance, as explained below.

At the moment only CPU processing is supported. Please make sure your script does not require GPU to execute.

Input

Accessible read-only via the /input directory.

Results of computations available in the Data Clean Room can be mounted to this directory. Once mounted, files are located at a specific path depending on the computation type.

  • Python and R: /input/<computation_name>/<filename>
  • SQL and Synthetic data: /input/<computation_name>/dataset.csv

Example: SQL Computation named salary_sum can be accessed at /input/sql_computation_result/dataset.csv

note

The dataset.csv file does not include headers.

Optionally, you can also mount your own static files to support your script.

Example: /input/code/preamble.tex or /input/code/report.Rmd

Learn how to mount input files in the sections below, either via the Decentriq UI or the Python SDK.

Script

Bring your existing R script.

Example logic to read, process and output data:

# Import libraries
library(dplyr)

# Read content from input file
table_data <- read.csv(file = "/input/table_name/dataset.csv", sep = ",", header=FALSE)
names(table_data) <- c("column_name_1", "column_name_2")

# Process data
results <- table_data %>%
group_by(column_name_1) %>%
summarise(
column_name_2 = mean(column_name_2)
)

# Write resulting files to output folder
write.csv(results, "/output/result.csv")

The input files are only available after the Data Clean Room is published and a dataset is provisioned. Therefore, when validating this script (before publishing) the input files will be empty.

To overcome errors during validation due to empty dataset, it's recommended to wrap the data processing logic into a try/except statement to handle expected issues, or mount a test dataset to the container and have an if clause to use it instead, in case the main dataset is empty.

note

The /tmp directory is made available read/write during the script execution to support your logic. It will be wiped once the execution is completed, and will not be available in the output.

Output

Accessible write-only via the /output directory.

Write all resulting files of your computation to this directory. Sub-directories are also supported.

Once the execution is completed, the output becomes available as <computation_name>.zip to be downloaded by users who have the required permissions.

Create a R computation in the Decentriq UI

  1. Access platform.decentriq.com with your credentials

  2. Create a Data Clean Room

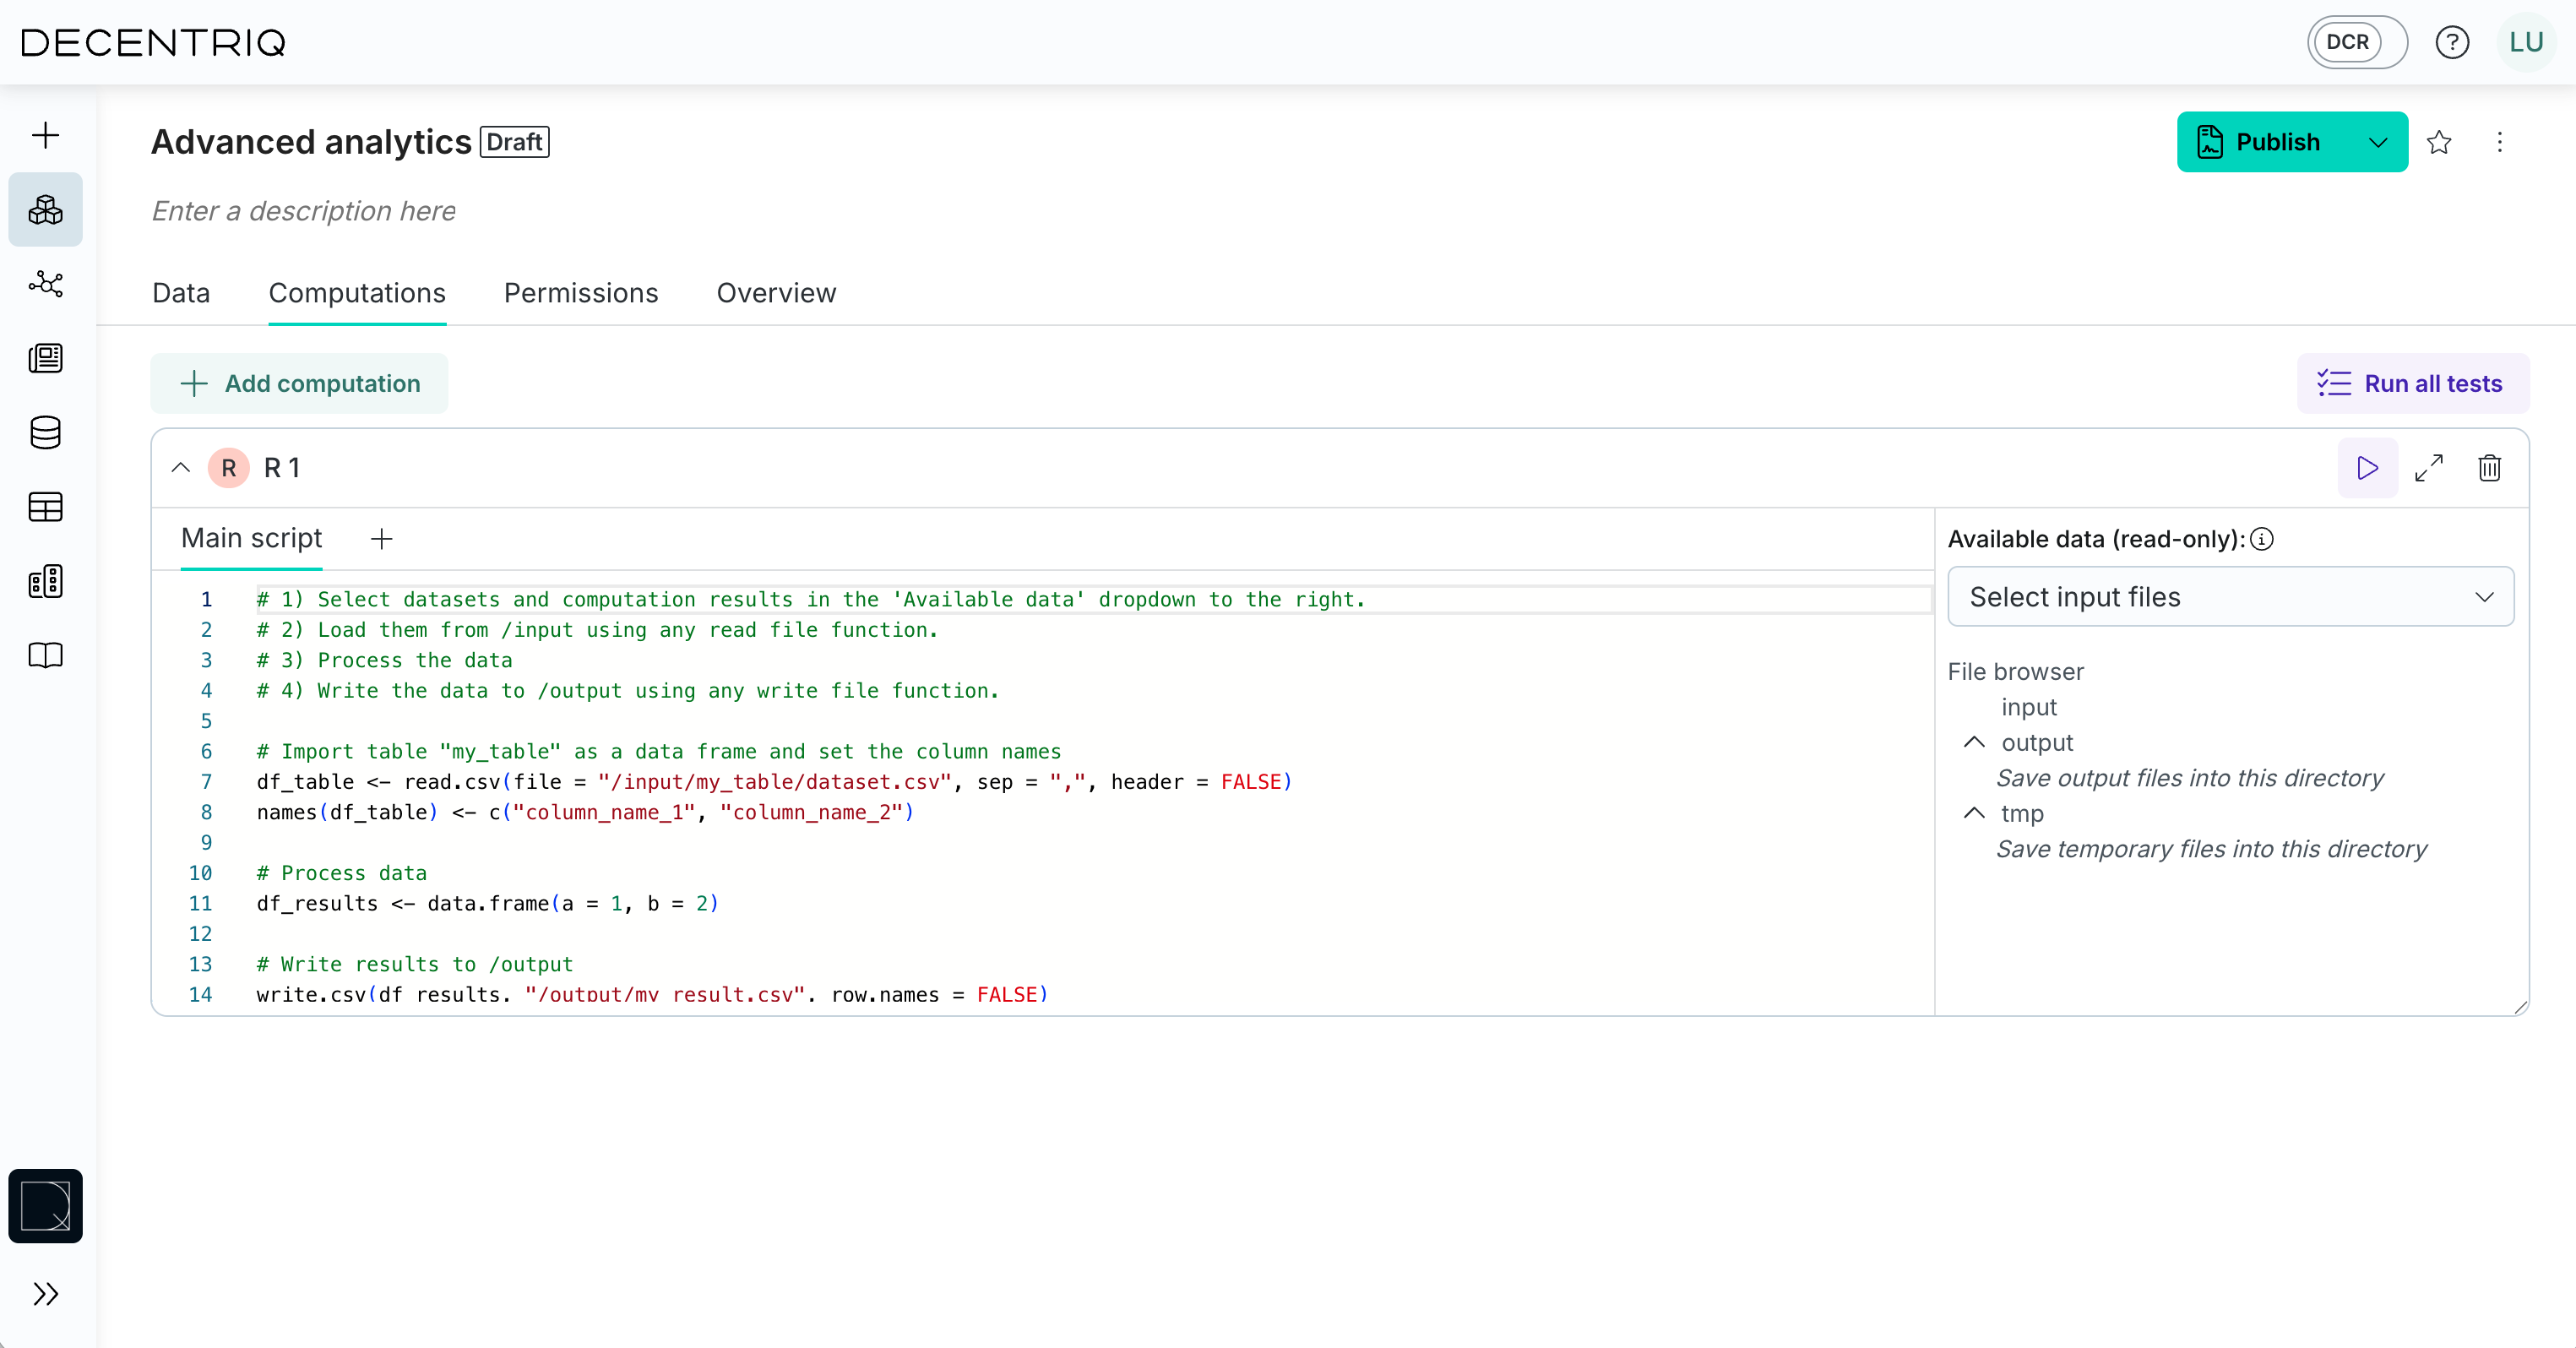
  3. In the Computations tab, add a new computation of type R and give it a name:

    Create R computation

  4. In the File browser on the right-side, mount the necessary input files (which will become available in the /input directory) by selecting existing computations, tables or files in the Data Clean Room:

    Mount R input

  5. In the Main script tab, paste your existing script and adapt the file paths based on the mounted files:

    Draft R computation

    When clicking the copy icon in front of each file in the file browser, you will get a snippet that imports it into a dataframe or file. Just paste it directly to your script.

    note

    If necessary, add static text files to the container by clicking the + icon next to the Main script tab. These files will be available in the /input/code directory.

  6. Press the Test all computations button to check for eventual errors in the script.

  7. Once the Data Clean Room is configured with data, computations and permissions, press the Encrypt and publish button.

  8. As soon as the Data Clean Room is published, your computation should be available in the Overview tab, where you can press Run and get the results:

    Run R computation

Create a R computation using the Python SDK

This example illustrates the execution of R scripts within the trusted execution environment and the processing of input data.

How to use this functionality is illustrated in this example. It is also recommended to read through the Python SDK tutorial, as it introduces certain important concepts and terminology used in this example.

Assume we want to create a Data Clean Room that simply converts some text in an input file to uppercase. Using the Python SDK to accomplish this task could look as follows:

First, we set up a connection to an enclave and create a AnalyticsDcrBuilder object:

import decentriq_platform as dq
from decentriq_platform.analytics import AnalyticsDcrBuilder

user_email = "@@ YOUR EMAIL HERE @@"
api_token = "@@ YOUR TOKEN HERE @@"

client = dq.create_client(user_email, api_token)

builder = AnalyticsDcrBuilder(client=client)
builder.\
with_name("Secure Uppercase").\
with_owner(user_email)

This enclave allows you to run R code and provides common libraries as part of its R environment.

Before worrying about execution, however, we need to add a data node to which we can upload the input file whose content should be converted to uppercase:

from decentriq_platform.analytics import RawDataNodeDefinition

builder.add_node_definition(
RawDataNodeDefinition(name="input_data_node", is_required=True)
)

Whenever we add a data or compute node, the builder object will assign an identifier to the newly added node. This identifier needs to be provided to the respective method whenever we want to interact with this node.

The script to uppercase text contained in an input file could look like this:

my_script_content = b"""
df_lowercase <- read.csv("/input/input_data_node", header=FALSE)
df_uppercase <- lapply(df_lowercase, toupper)
write.table(df_uppercase, "/output/uppercase.csv", sep=",", col.names=FALSE, row.names = FALSE, quote = FALSE)
"""

Here we defined the script within a multi-line string. For larger scripts, however, defining them in a file would likely be easier.

Now we can add the node that will actually execute our script. To use this script in a Data Clean Room, it first has to be loaded into a RComputeNodeDefinition node, which is then added to the DCR configuration. This makes the R script visible to all the participants in the DCR.

# If you wrote your script in a separate file, you can simply open
# the file using `with open` (note that we specify the "b" flag to read
# the file as a binary string), like so:
#
# with open("my_script.R", "rb") as data:
# my_script_content = data.read()

from decentriq_platform.analytics import RComputeNodeDefinition

builder.add_node_definition(
RComputeNodeDefinition(
name="uppercase_csv_node",
script=my_script_content,
dependencies=["input_data_node"]
)
)
note

The name given to the compute node has no meaning to the enclave and only serves as a human-readable name.

The enclave addresses computations (and data nodes) using identifiers that are automatically generated by the Data Clean Room builder object when adding the node to the Data Clean Room. These ids are required when we want to interact with the node (e.g. triggering the computation or referring to the computation when adding user permissions).

builder.add_participant(
user_email,
data_owner_of=["input_data_node"],
analyst_of=["uppercase_csv_node"]
)

dcr_definition = builder.build()
dcr = client.publish_analytics_dcr(dcr_definition)

data_room_id = dcr.id

After building and publishing the DCR, we can upload data and connect it to our input node.

# Here again, you can use the Python construct `with open(path, "rb") as data`
# to read the data in the right format from a file.
import io
from decentriq_platform import Key

key = Key() # generate an encryption key with which to encrypt the dataset
raw_data_node = dcr.get_node("input_data_node")
data = io.BytesIO(b"hello,world")
raw_data_node.upload_and_publish_dataset(data, key, "my-data.csv")

When retrieving results for the computation, you will get a binary file that represents a zipfile.ZipFile object containing all the files you wrote to the output directory in your script.

r_node = dcr.get_node("uppercase_csv_node")
results = r_node.run_computation_and_get_results_as_zip()
result_txt = results.read("uppercase.csv")
assert result_txt == b"HELLO,WORLD\n"
note

When the referenced Data Clean Room was created using the Decentriq UI:

The name argument of the get_node() should be the node name you see in the UI "Overview" tab.